
How to Encourage Positive Behavior & Teach New Skills, while Building Connection with Your Child
Dinnertime squabbles. Car riding drama. Grocery store meltdowns.
These occurrences are frequent when you have a younger child, particularly one who has sensory needs, ADHD, or autism.
You may be reading this and thinking “Yes! This happens all the time!”
But you may also be questioning: “But how do I help my child through this without losing my cool, bribing, counting to three, etc?”
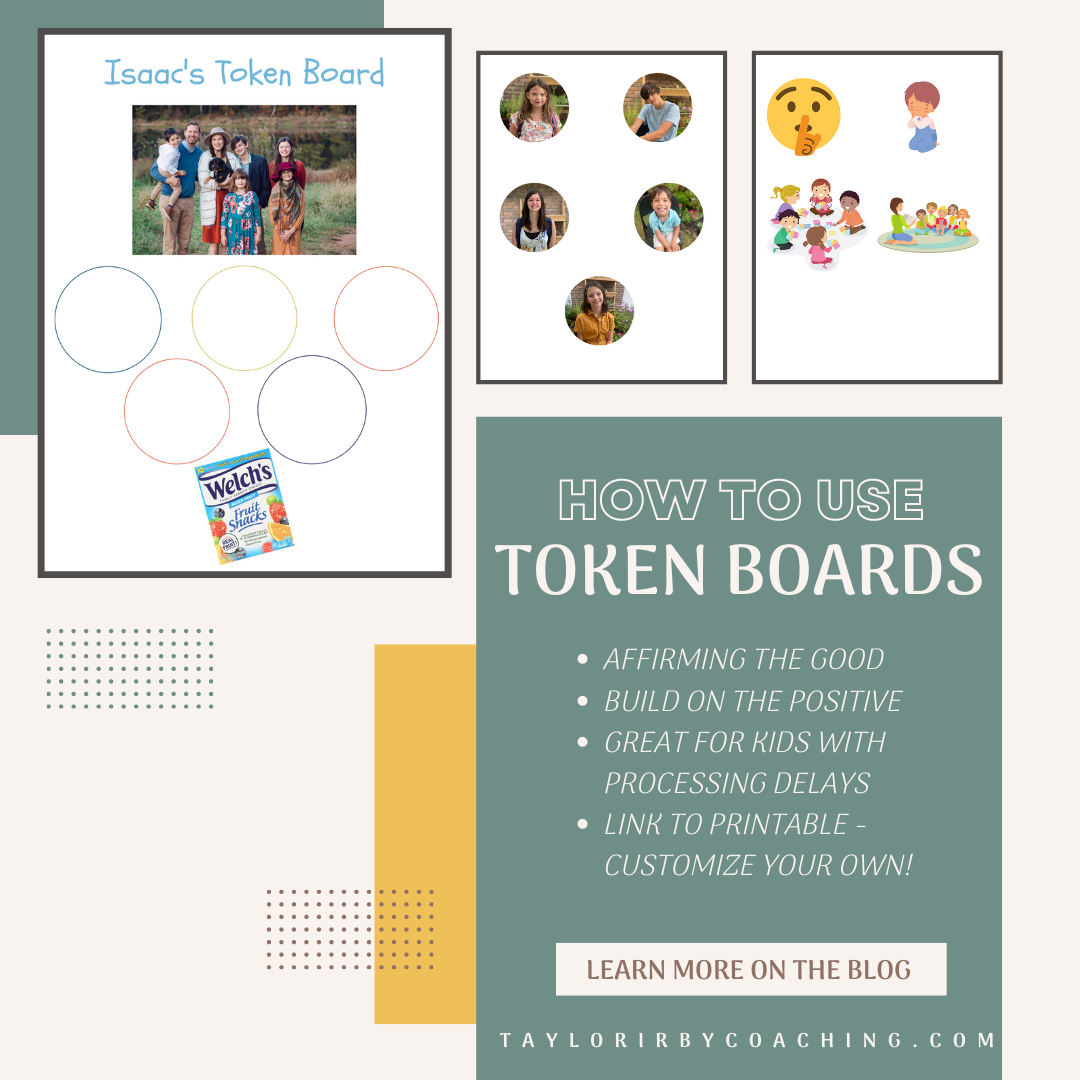
Introducing…THE TOKEN BOARD!
The token board was used in my child’s preschool. Unlike bribing, it really helps build positive interactions to encourage what is already going well. We still use this at home during dinnertime.
I’ll quickly inform you how to use it and then I’ll show you how you can create your own!
What is a Token Board?
A token board is, simply put, a way to build on positive interactions. Instead of punishing the child for not cooperating, you find ways the child IS cooperating and you praise that.
How do I use a Token Board?
You can make your own or you can print out the template I’ve created and drag and drop your child’s favorite things (I did one of our family!)
Create a visual that your child loves. We have done Paw Patrol, Curious George, and Mickey Mouse in the past. He loves his family board though! (download the template here!)
Decide on ONE interaction you want to change. We have done staying in your seat during mealtimes (instead of climbing on the table!), listening to story time, keeping pants dry, keeping hands to self, etc. The idea is to only choose ONE thing. For some kids it can be overwhelming to look at ALL the things but choose only ONE. For an example, I’m going to pick dinnertime behavior.
Explain the token board to your child, display the token board. We put it up right by his spot at the dining room table. We were clear with what we wanted to see (and what we knew he could do): refrain from climbing up on the table during the meal. I set my timer for 2 minutes. If he could make it two minutes, he gets to put a token on his board. I make a big deal. The whole family gives some BIG attention to that wonderful choice and I reset my timer. Once he makes it to 5 tokens, he gets 2 fruit snacks.
What happens when he climbs on the table before 2 minutes? If it happens once, I just reset my timer. My script is something like this: “Oops! We made a mistake! That’s not a big deal. I know you can do it…I’m just going to reset my timer and we can try again.” Usually that works and he gets his token for the next 2 minutes. But if it happens again, I set my timer for 1 minute. The key is SUCCESS and you want success REALLY QUICKLY and AS MUCH AS POSSIBLE.
When things are going well: When we have been practicing staying in our seat, and it’s obvious he can sit for 2 minutes, I then increase it to 3 minutes. Sometimes its clear I need to go back to 2 minutes, but over time, 3 minutes will be a good stretch. Then we build to 4. Then 5. Once you feel the behavior has diminished, you can choose another behavior for the token board.
A little note about token boards: We never remove a token. This can be discouraging to a child to have something that represents positive interactions be taken away. Just continue to reset your timer. Don’t make a big deal of it. Before you know it, your child will have a full token board and get 3 fruit snacks and be able to fill the board again. And chances are, they will be really proud of the work they have done, and this is TIME TO CELEBRATE! Talk with your child about the hard work they have done, and how proud you are of them.
How to Make Your Own Token Board:
Materials: Printer, Template to personalize, Paper, laminator or contact paper, adhesive velcro dots
Personalize the template with whatever pictures you want. We love our family board, but you can use clip art or other pictures to fill in the spaces.
Print it out, cut out the tokens, and laminate them. You can use contact paper or, if you have a laminator you can use that.
Use velcro dots to attach to each circle in the board. Place the corresponding dots to each one, then place the tokens on the dots to attach.
Your board is now ready to use!
We have had such wonderful success with this tool, and I’m excited to share it! Send me an email or tag on social media to show me how you are using yours!!
Alongside,
Taylor